SKILLZ: 7 Tips for Shooting Time-Lapse Video

*The following post is excerpted from page 48 of the Image Control chapter of my new book, The Shut Up and Shoot Freelance Video Guide which is now shipping. Please consider ordering a signed 400-page, 700-illustration, full-color copy directly from me here to help support all the FREE info on this website.
[hr]
Time lapse is a cinematic technique that allows us to manipulate time with our cameras so that events that unfold over the course of hours, days, or even months can be condensed down to a few dramatic seconds or minutes of fast-motion video. From a the sun setting over a valley to a skyscraper going up to an artist creating a painting on a blank canvas—time-lapse video will condense the whole event to a single short captivating sequence.
Here are my 7 quick tips for shooting better time-lapse video with prosumer video cameras:
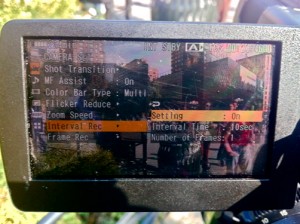
1. INTERVAL RECORDING MODE

Some prosumer cameras offer an interval recording mode to shoot time-lapse footage. In the interval recording mode, a camera can be set-up to shoot anywhere from a frame to a few seconds of video at set intervals of time. Your choice of shot length will vary from camera to camera but will generally fall in the range of one frame to several seconds per interval.
For the smoothest time-lapse effect, the shorter the shot, the better, so one frame is ideal. If your camera doesn’t have single-frame recording, set it to the shortest length of time available.
2. INTERVAL TIMES
Next, you need to set the interval time. Choices will fall in the range of 1 second to several hours. Typically, setting the time of your intervals somewhere between 1 to 10 seconds will yield a pretty cool effect, but you might find that longer intervals work better for the feel you want to create for your particular subject matter and how much screen time you want the event to take up when played back.
So if you were shooting 24P video of a 10-minute event with the interval recording mode set to record one frame of video every second, you would end up recording 60 frames of video for every minute that you shot for a total of 600 frames of video. When the video is played back at 24 frames per second, the 10-minute event you shot would be condensed down to just 25 seconds of fast-motion footage.
3. USE A TRIPOD
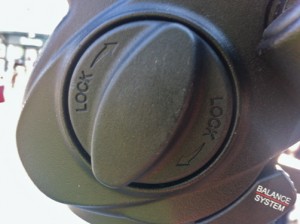
 If you’re shooting time-lapse video, your camera has to be on a tripod and locked down the entire time. The whole effect is blown if your camera is bumped even slightly somewhere during the shot. For this reason, it’s important that you place your camera in a secure spot that won’t be disturbed by people in your vicinity, curious pets, or anything else.
4. PLUG INTO POWER
One thing you’ll definitely want to do for any lengthy time-lapse shot is use AC power instead of batteries. Remember, if your camera’s going to be on for hours on end, you don’t want the batteries to die out in the middle of making the magic.
5. BEWARE OF DAYLIGHT SHOTS

If you will be shooting outdoors or otherwise relying on daylight to illuminate your subject matter, the level of lighting will shift with the moving sun and clouds, resulting in uneven exposure. This may or may not be a desired effect, depending on the exact subject matter and lighting conditions.
For example, if you want to record a sunset going into nightfall and have set up your camera manually exposing for full daylight, once the sun starts to set, your shot may quickly become very underexposed, if not completely dark. Similarly, if you manually expose for times when the sky is cloudy, and an hour later the clouds clear up and the sun comes out, you will probably end up with a completely blown-out shot. Because of these potential issues, I recommend using autoexposure, so your camera adjusts to the scene as the lighting changes throughout the day. Autoexposure can often be fine-tuned in the menu.
6. USE AUTO-WHITE BALANCE
For the same reasons as just described, you should also put set your camera on auto-white balance. Throughout any lengthy day-lit scene, color temperature will likely shift. In the case of sunrises and sunsets (perhaps the most popular time-lapse subject matter), it will shift dramatically from cool to warm or vice versa. So auto-white balance is crucial to capturing these scenes well.
7. SLOW DOWN THE SHUTTER SPEED
Lowering the shutter speed a little may help smooth out the time-lapse effect, particularly if your camera can record only 0.05 seconds of footage in this mode (as opposed to one frame, which is preferable). Otherwise, cameras with longer interval recording times such as 0.05 seconds will produce a more choppy time-lapse effect.
A FINAL NOTE
If a time-lapse shot is a particularly important element of your project, the best thing I think you can do is set aside some time beforehand to do some time-lapse test shoots that experiment with the key settings of interval time, shutter speed, and exposure. You can also play around with playback speed and blurring effects in postproduction to get closer to your desired time-lapse effect.
The bottom line is that time-lapse is not an exact science here, because the end effect is largely dependent on a combination of your camera’s capabilities, the subject matter, and the feel you want to give this part of your story. So take the time to play around with it some and discover which combinations of settings works best for any given scene.
Warning: count(): Parameter must be an array or an object that implements Countable in /home/j0jr2zr34tz1/domains/new.downanddirtydv.com/html/wp-includes/class-wp-comment-query.php on line 399

Andrew James
Awesome! These 7 tips are very useful to those people who are into video editing especially for the beginners.